
Our tips for fitting heated grips, the essential winter accessory for combining comfort and maneuverability.
Heated grips are a seasonal accessory. Ixtem Moto sells them every day as soon as winter sets in. To help you assemble them, we've put together this little tutorial. It's made with love by passionate amateurs. If we can do it, so can you :)
We recommendthat you :
- Measure the size of your original grips to order the right size, and check the diameter of your handlebars. Generally speaking, you're looking at a 22 mm diameter with 120 mm grips. On a custom bike, the handlebars will be more like 25 mm.
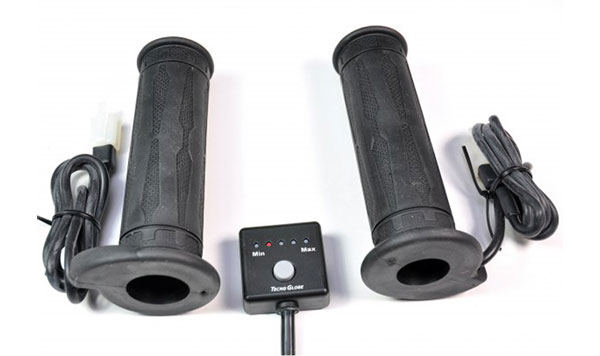
The grips we fitted : Tecnoglobe Moto Luxe 120/22mm heated grips
- Bring along your motorcycle or scooter's technical manual. This will save you time looking for where to plug in your grips, especially the + after contact.
The + after contact : What's that beast? It's the red wire that carries the + current. It's important that the red wire is connected after the ignition to prevent an ill-intentioned person from switching on your switched-off motorcycle grips heaters and draining your battery.
It would also be enough to forget your heated grips in operation after leaving your motorcycle to obtain the same result :) The connection point often used for the + after contact is the pilot light. In our case, we plugged into an accessory socket that was originally designed to accommodate the brand's heated grips.
Ground: This is the -, the black wire. The ground must be connected to a metal part on your 2-wheeler. Usually, it's the frame that's chosen for this operation. On our bike, we found a fixing screw at the fork head.
Time required: 1h to 1h30 if you're not wide awake.
Basic tools: crimping pliers, wire cutters, insulating tape, Phillips screwdriver, Allen keys, open-end wrenches and a small electrical tester. In our case, we also used a saw and a file.
Electricalsupplies not included with our handles: a round terminal and a branch terminal.
Technical level: advanced beginner
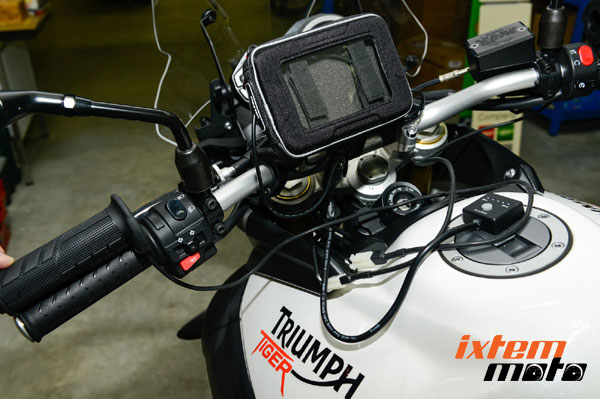
Our test bike : a 2012 Triumph Tiger 800.
All kidding aside, let's get down to business!
We started by positioning the handles on the bike to see how long the cables were and where we wanted to run them.
We then set about disassembling the handlebar ends with the Allen wrench to remove the original grips.
To remove the grips, we slid a screwdriver between the handlebar and the rubber of the grip to get a good grip. The left-side handle (clutch) came off without a hitch.
The right-hand side with the throttle barrel is a little trickier, as we discovered the plastic lugs that hold the original handle in place. A look at the forums reveals that this is the case on almost all Triumphs.
To remove the handle and fit the future heated handle, we cut the lugs with a small hacksaw and filed away the imperfections. You'll notice that we've protected the tank to avoid damaging it through clumsiness.
On some bikes, the handles are glued on. In this case, use the old hair-dryer technique to heat up the glue and easily remove the handles.
All that's left to do is slide on the new handles with forceps and soap :)
The soap operation:
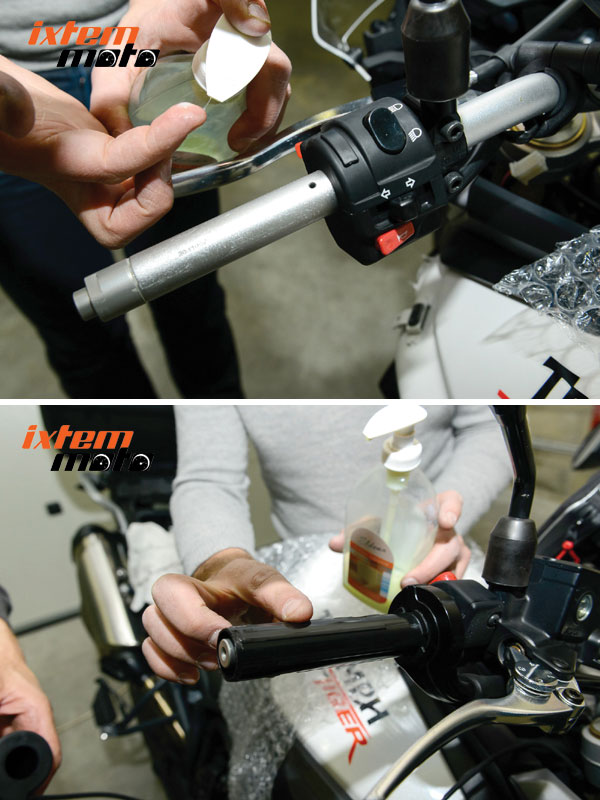
Next, slide the handles onto the handlebars and gas cylinder. On the left-hand side, don't go too far, or you'll have a gap between the handlebar end and the grip. Leave enough slack in the wiring, especially at the throttle, so that it turns without pulling on the cables.
We then connect the grips to their wiring harness.
The next step is to connect the main wiring harness to the motorcycle's electrical system. On the technical review, we saw that there was an accessory socket which was originally designed to accommodate the brand's heated grips. So we decided to piggyback on it. This socket is located under the fuel tank. So we had to remove the tank from our Tiger.
Even though it's a trail bike, to remove the tank, we had to dismantle the plastic side covers. Fortunately, we're not in rally raid mode :)
Make sure you locate all the screws before you start. We had screws on the outside and inside of the fairing.
After unscrewing them, we had to unclip the plastics. To unclip a part, you don't have to force it. You just have to find the right way to attach them.
Normally, you have 2 screws holding the tank in place. When you've finished, lift the tank to disconnect the hoses, fuel tap and electrical plugs.
Two people are required for this operation. One to lift the tank, the other to disconnect. When you've finished, carefully place the tank on the ground to avoid damaging it. Avoid filling up with petrol beforehand :)
With the operation complete, we located the original accessory plug and tested that it was indeed a + after contact using a small, basic tester.
Draper tester used:
This tester is very simple to use. On one side, you connect the alligator clip to a metal point (ground) and prick the wire to be tested on the other side. If the light comes on, there's power. If the light doesn't come on when the motorcycle's ignition is turned to "On", it's a + after contact.
We used a quick-disconnect terminal (shown here in blue) to take the current from the accessory socket and connect the black ground wire to a screw on the fork head. To do this, we used a round terminal that we crimped.
Connecting the ground (-)
Photo 1: Positioning the round terminal to be crimped.
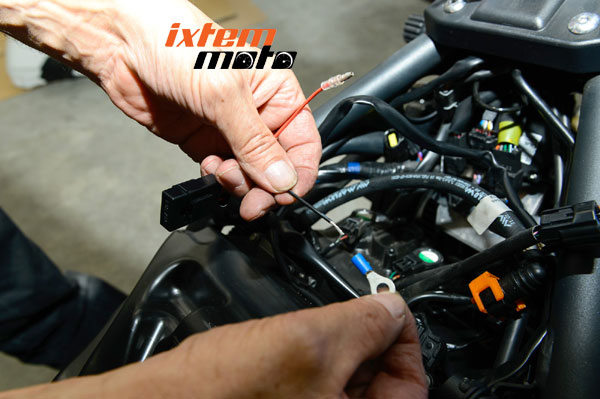
Photo 2: Screwing the round terminal onto the ground we've found

Once the tank is back in place, all that's left to do is attach the remote control for the heated grips to the handlebars, and fit rislans to secure the cables to the rest of the bike. At the same time, we took the opportunity to protect the remote control connections with insulating tape.
Thanks to Jacques for the loan of his Tiger 800 and the photos, and to Patrick for the technical aspects.
Stay tuned for our next tuto :)
PS: Did you like this TUTO? Share it with your friends, it means a lot to us. Thanks ;)
Our last posts
#interviewmotarde #etonvaoumaintenant #motardevoyageuse #voyagemoto
#hivernale #millevaches #équipementmotard #aventuresmichel
#aventuresmichel #hardefitour #raidenduro #tout-terrain
Aucun produit